Shrink tunnels look simple from the outside—a conveyor, a heated chamber, and rolls of film. But once you open the side panels, the inside tells a different story. It is a complex system of airflow engineering, heater placement, cooling patterns, and the delicate balance between conveyor speed and heat.
I wrote this guide for buyers, operators, and anyone curious about what actually happens inside a shrink tunnel. My goal is to keep the explanation clear and direct, without heavy engineering jargon.
Quick Links for Reference:
- Real-world examples:Industries That Use Shrink Tunnels
- Machine specs:Shrink Tunnel Product Page
What a Shrink Tunnel Really Does
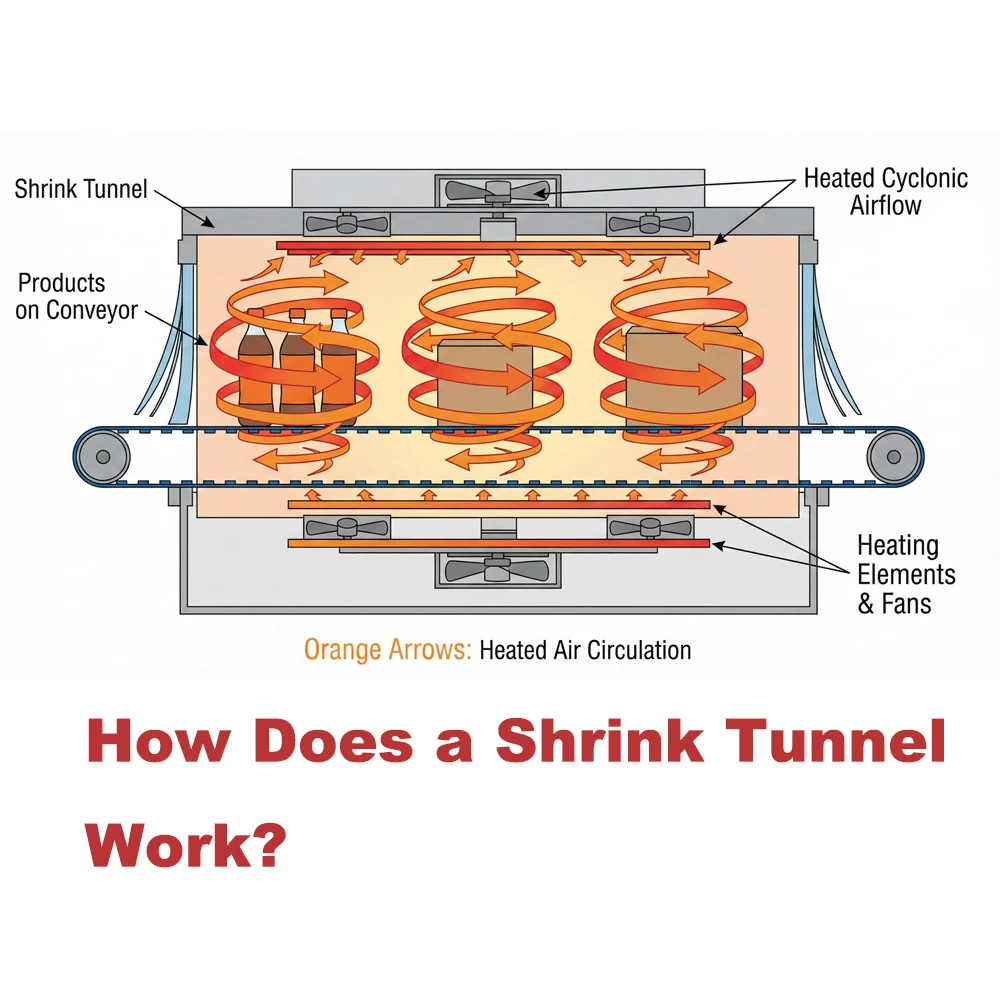
A shrink tunnel uses heated air to tighten shrink film around a product. That’s the short explanation. However, the real engineering lies in how the tunnel controls air movement.
Film does not shrink evenly on its own. Without a steady, calculated airflow pattern, you will see wrinkles, weak corners, or “dog ears” (loose triangular flaps). The tunnel’s primary job is to guide heat around the product so the film contracts smoothly and uniformly.
Most modern tunnels follow the same principle: warm the film, circulate heat around the item, and let the film cool immediately after shrinking. Even small changes—like the angle of a nozzle or the distance between the heater and conveyor—create visible differences. This is why two tunnels with the same temperature settings can yield very different results.
Step-by-Step: How Shrink Film Reacts Inside the Tunnel
I’ve spent enough time in factories to know that “just heat the film” is not a strategy. Shrink film goes through three distinct stages inside the chamber. Understanding these stages makes setup easier, especially when switching between film thicknesses.
1. Entry — The Softening Phase
When the product enters the tunnel, the film has only begun to loosen. At this stage, the tunnel uses gentle airflow. If the air velocity is too high here, the film will blow upward or “balloon” before it has a chance to grab the product.
2. Mid-Zone — The Shrinking Phase
This is where the heavy lifting happens. The heaters and blowers work together to push high-velocity warm air across all sides of the package. The goal is even heat distribution. A tunnel with weak side air or poor bottom flow will reveal itself here, resulting in uneven shrink marks or holes in the film.
3. Exit — The Cooling Phase
Right after shrinking, the film must cool to “set” its shape. Cooling provides the final hold, strength, and clarity. Many high-performance tunnels use extra cooling fans at the exit. Without this step, products—especially heavy packs—may come out looking soft or saggy.
Key Components: Inside the Heat Chamber
The hardware inside a shrink tunnel isn’t complicated, but every part must work in harmony.
- Heaters: These elements warm the air to the set temperature, typically between 120°C and 200°C depending on the film. Quality heaters maintain stability even when the conveyor speed changes.
- Blowers (Air Circulation): Fans push the heated air. Their position is critical. If one side of a product shrinks tighter than the other, the blower layout or damper adjustment is usually the cause.
- Conveyor System: The belt moves the product through the heat zone. Mesh belts are ideal for small items as they allow airflow to reach the bottom. Solid belts or rollers are better suited for heavy, unstable products.
Troubleshooting: Why Airflow Matters More Than Temperature
Many first-time users try to fix shrink problems by simply raising the heat. In my experience, 80% of issues are airflow-related, not temperature-related.
Whenever I walk into a warehouse to troubleshoot, I look for airflow imbalances. A well-designed tunnel guides air in a loop (often called “cyclonic” or “recirculating” airflow), ensuring heat wraps fully around the product.
- If airflow is stable: You can run at lower temperatures and still get a tight seal.
- If airflow is uneven: High heat won’t fix the problem; it will likely just burn the film or cause split seams.
Quick Guide: Matching Film to Tunnel Settings
Different films react differently to heat. Here is a quick reference table based on common factory setups:
| Film Type | Typical Characteristics | Tunnel Heat Requirement | Best For |
| Polyolefin (POF) | Soft, clear, shrinks fast | Low to Medium (120°C – 150°C) | Retail food, toys, boxes |
| Polyethylene (PE) | Thick, tough, durable | High (170°C – 200°C) + Strong Cooling | Multi-packs, water bottles |
| PVC | Brittle, emits odor | Low (Heat Sensitive) | CD cases, gift baskets |
Real Factory Example: Speed vs. Heat
One warehouse I visited used the exact same settings for every product to simplify their workflow. Small retail packs looked fine, but larger cartons came out soft on the bottom.
We didn’t touch the temperature. Instead, we slowed down the conveyor belt. The bottom of a big carton acts like a heat sink; it needed more time in the tunnel, not more heat intensity. This solved the issue immediately. This is why testing several products before buying a tunnel is crucial.
Frequently Asked Questions (FAQ)
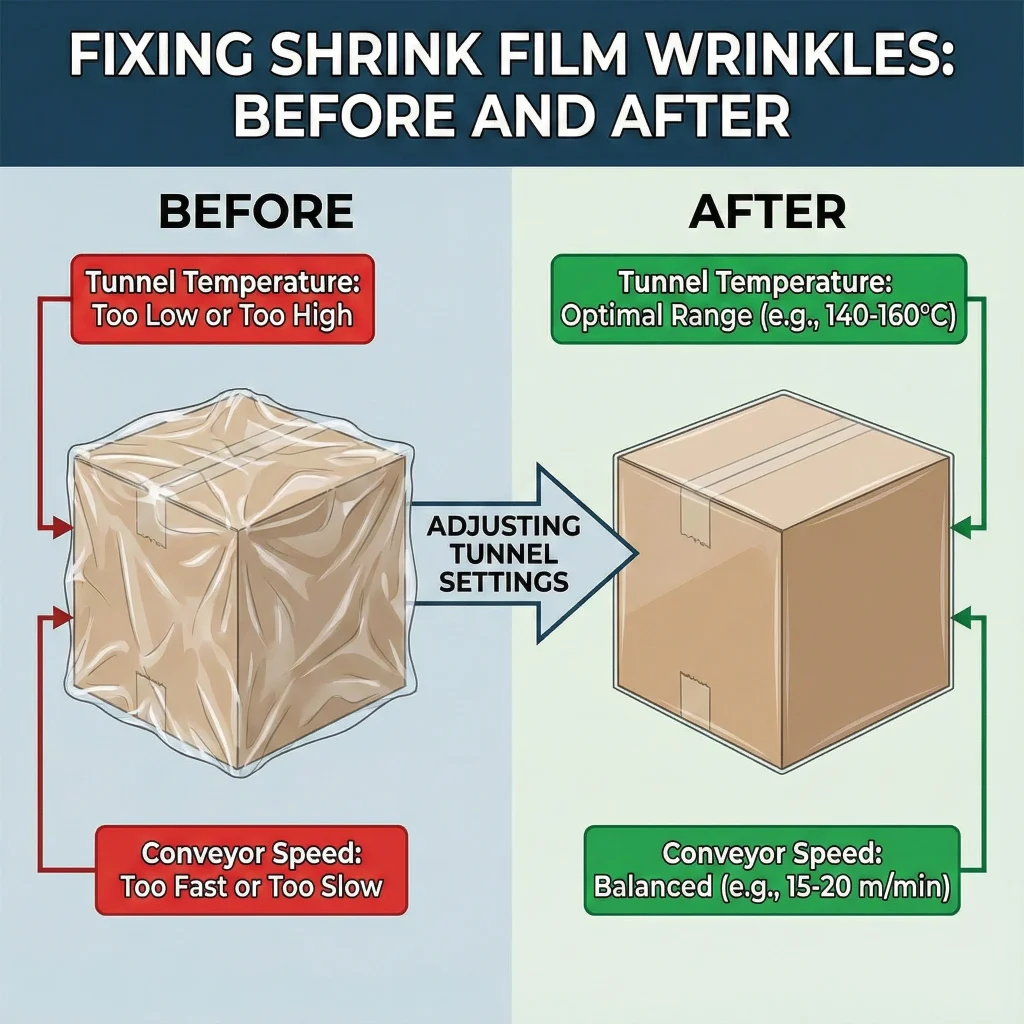
Q: Why does my shrink film have wrinkles? A: Wrinkles usually mean the film didn’t shrink enough. This is often caused by the tunnel temperature being too low, the conveyor speed being too fast, or low airflow preventing the heat from reaching the film surface evenly.
Q: Why is the film burning or splitting? A: This typically happens when the temperature is too high or the conveyor is moving too slowly. It can also happen if the airflow nozzles are pointed too directly at one spot on the package.
Q: Can I use a hair dryer instead of a shrink tunnel? A: For one or two items, a heat gun (not a hair dryer) works. However, for consistent, professional results on more than a few items, a tunnel is required to ensure even shrinkage and structural integrity.
Conclusion and Next Steps
A shrink tunnel is more than just a heater with a conveyor. It is a balance of airflow, film chemistry, and timing. When these elements align, the result is a clean, tight, and professional package.
- Learn More: For a broader definition of packaging materials, you can read Wikipedia: Shrink Wrap or check technical notes from Sealed Air.
- Explore Models: If you are comparing tunnel types for your production line, visit our Shrink Tunnel Product Page for specifications.